Automatically Post Images to Tumblr with Automator
For the past few months I have been drawing every day on 2.5 x 3.5 inch pieces of Bristol board as part of my most recent ‘kooBtrA’ project. kooBtrA = ArtBook in reverse, as I plan to self publish a full-color book containing all the images sometime after one year passes.
As you might imagine, finding the time to draw every day can be challenging. Not to mention the fact that I’ve also been posting these images to my Tumbleog; which includes scanning, resizing, and logging into Tumblr to post the image along with a description and tag. This became mundane after the first few days of posting, so I decided to set time aside to automate this process, as doing so would surely save me time in the long run.
I did a bit of research and discovered that Tumblr offers the ability to send posts via email. This immediately gave me the idea of using Automator to streamline this process, as Automator offers a very straightforward ‘New Mail Message’ Action. This would allow me to create an Image Capture Plugin that grabs the image that was scanned and include it in the email message, right? Well, yes, but with one caveat. With Snow Leopard’s introduction came a few changes, one of which removes the ability to scan to a specified folder while using an Image Capture Plugin, (the image is saved to the ~/Pictures folder, then the Workflow runs). The workaround in my case was to use a Folder Action, which would result in the Workflow running any time a new file is added to the specified folder.
What I had been doing until this point was scanning the image to a subfolder of my ~/Documents folder; scaling the image to 300px max on either side depending on orientation; then uploading the image to Tumblr.com along with a description and tag. The Folder Action Workflow I ended up producing cuts the time this took in half.
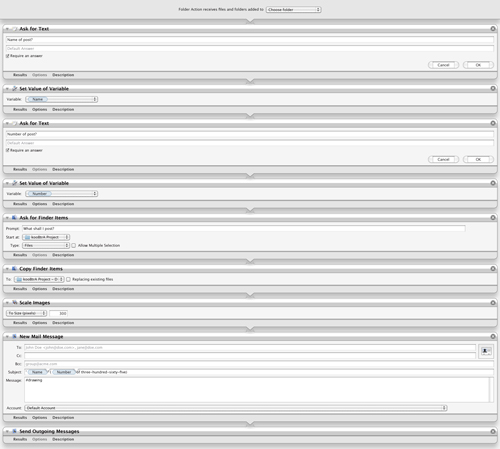
The first thing I did was create two variables. One for the name of the post and one for the number of the post. You can achieve this by right or control clicking in the variables window at the bottom of the application window and choosing ‘New variable.’ I left the value blank, as this will vary with each post. The next step was to start dragging actions over to the right of the application window. The first is an ‘Ask for Text’ Action, which asks for the name of the post, then sets the value of the variable. The same goes for the number of post. The Workflow then asks for the Finder items to act on, then copies them to a new location and scales them to 300px. Finally, the ‘New Mail Message’ Action is added, which utilizes the name and number variables that were set previously, as well as receives the resized image from the previous Action. The last Action that was added was ‘Send Outgoing Messages,’ which is fairly self explanatory.
Below is the printed Workflow for your reference should you wish to accomplish something similar. If you have any suggestions as to improving this Automator Workflow please leave a comment. For more information regarding Tumblr’s post via email option please visit http://www.tumblr.com/docs/en/email_publishing.
